TechCreative
    • Home
    • Computer
      • Windows
      • Mac
    • Internet
      • Alternatives
      • Digital Marketing
      • Social Media
    • Business
    • Technology
    • How to
    • Gadgets
    • Lifestyle
      • Education
      • Gaming
      • Entertainment
      • Health
      • Travel
    • Phones
    Wednesday, March 22
    TechCreative
    Home»How to»How to Disable Face ID on App Store Purchases
    How to

    How to Disable Face ID on App Store Purchases

    MartinBy MartinDecember 23, 2020No Comments2 Mins Read
    How to Disable Face ID on App Store Purchases

    As we already know, the Face ID on iPhone is a secure and appropriate authentication method, also convenient sometimes. For example, purchasing an app from the App Store is just a tap away, and I’ve accidentally purchased some apps that I did not want. Not to forget, unlike Android, Apple does not show a refund option for the first two hours. In this post, I would show how you can easily disable Face ID on the App Store. Let’s get started.

    Disable Face ID on App Store

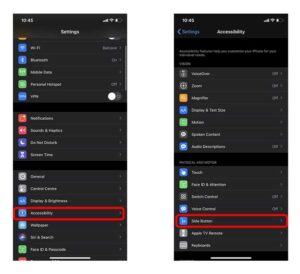
    Once you set up Face ID on your iPhone, it is also automatically applied to the App Store. Meaning that you can purchase free & paid apps by merely clicking the side button, and Face ID immediately authenticates with your Face. So, to turn this feature off, navigate to the Settings app, then find Accessibility Settings. Afterward, on this settings page, click the Side button option under the Physical and Motor section.


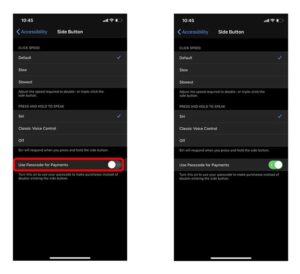
    Now, turn the Switch on next to “Use Passcode for Payments.” It would disable the Face ID from the App Store & also any other place which involves payments, including in-app purchases. Although, it would not affect your Home Screen Lock or app lock.


    Furthermore, as the Face ID is disabled, the App Store would ask for the Apple ID password every time you buy something, including free apps. We can fix that instantly by allowing free apps to be downloaded without any password or Face ID.

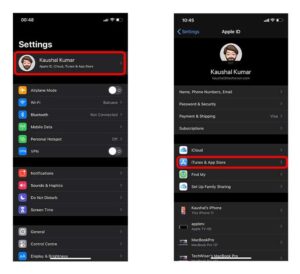
    Open the Settings app and click your Apple ID Avatar. Find the option “iTunes & App Store” and click to explore its settings.

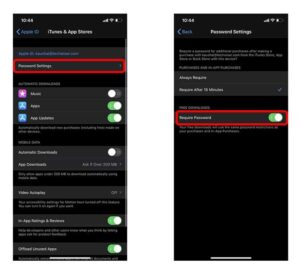
    Click Password Settings and turn the switch next to “Require Password” OFF. That’s all you need; your iPhone is now ready. You can go ahead & purchase apps without stressing about purchasing apps accidentally.


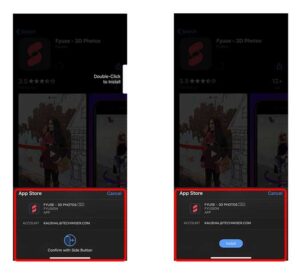
    Here’s a side by side comparison of how the interface looks with Face ID enabled & disabled.

    Read:  How to Quickly Fix the Error Code 0x800f0988 in Windows 10

    Final Words

    Dear Visitors, it was a quick & easy way to disable Face ID on your iPhone for App Store purchases. It is a handy feature that enables you to remove the Face ID authentication from the purchases & install free apps one-tap. So, what do you think of this method? Let me know in the comments section below.

    Previous ArticleHow to Create Gifs From Any YouTube Videos
    Next Article How to Easily Fix High Pings in Online Multiplayer Games

    Related Posts

    How to Zip and Unzip Files on Chromebook

    How to Zip & Unzip Files on Chromebook

    January 28, 2023
    Google Docs on Phone and PC

    Easy Ways to Save Images From Google Docs on PC & Phone

    January 27, 2023
    Delete Reddit Messages from your Inbox

    How to Delete Reddit Message from your Inbox

    January 25, 2023

    Leave A Reply Cancel Reply

    • Popular Posts

    Cinema HD APK – Download on Android & PC to Watch Latest Movies

    February 20, 2023
    Funny Faces Apps

    Top 15 Best Funny Faces Apps (Android/iPhone) 2020

    September 20, 2020
    Best Photo To Cartoon Apps

    Top 20 Best Photo To Cartoon Apps (Android/iPhone) 2020

    September 20, 2020
    Export Your Bookmarks in Chrome

    How To Export Your Bookmarks in Chrome

    September 21, 2020
    Manage Your Saved Passwords in Google Chrome

    How To Manage Your Saved Passwords in Google Chrome

    September 21, 2020
    Clear Your Chrome Browser Cache on PC

    How To Clear Your Chrome Browser Cache on PC

    September 22, 2020

    5 Best Website Builders in 2020

    September 23, 2020
    Copyright © 2021 TechCreative - All Rights Reserved - Privacy Policy - Sitemap - Write for us - Contact US

    Type above and press Enter to search. Press Esc to cancel.