
Today, in this article, I will discuss error code 0x80004005, its various causes, and related solutions. This error arises mostly in the case of failed Windows 10 Update. It is why you must check for updates if available for your System’s architect and apply the same to get rid of this issue.
Besides, missing or corrupt DLL files, obsolete disk drives, outdated Windows Update are some of the prime and vital causes behind this Error 0x80004005. Manually install the recent updates, Run Troubleshooter, SSU, & use System restore point are common approaches to fix this problem. If none of these works, you may even execute the DISM command or replace Dpcdll.dll File to solve this issue.
Run the Windows Troubleshooter
Run System File Checker Commands
Run System File Checker Commands
Perform DISM Command
Replace Dpcdll.dll File
Update your PC with the latest patches & SSU
Use System Restore point
Perform a Clean Install
Fix: Error code 0x80004005 on Windows 10
Here, I depict some methods to fix error code 0x80004005 on your Windows 10 PC. So without further ado, let’s learn them one after another in detail.
1. Run the Windows Troubleshooter
Most of the time, a failed Update probably causes the appearance of several bugs. Error code 0x80004005 is one such example, and you can fix this issue by using the default Troubleshooter.
Step 1: At first, press Windows + S jointly to open the Search.
Step-2: Type Control Panel in the search bar and press the Enter key.
Step 3: Now, on the next window, choose Small icons in View by scrolling down and press Troubleshooting.
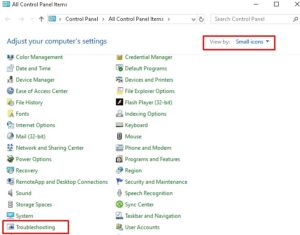
Step-4: Again, from the left section, tap View All, followed by System and Security.
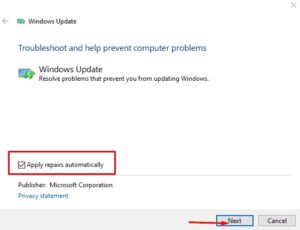
Step 5: Afterward, right-click on the Windows Update and select Run as an Administrator.
Step 6: On the succeeding window, tap the Advanced option. Here, activate Apply repairs automatically check box afterward Next to proceed further.
Step 7: Again, tap on the close button to complete the repairing process. Click View detailed information to see the full result.
Step 8: At last, Restart your PC to save the changes made so far.
2. Run System File Checker Commands
The System core files play a prime and vital role in the smooth running of your entire PC. So if any of these files get corrupted, there probably arise error 0x80004005. If that is the case, running System File Checker may resolve this error. Here is how to go-ahead-
1. Press Windows + R together to launch the Run dialog.
2. Now type cmd in the text box, hold Ctrl+Shift key after that press Enter.
3. The Command Prompt as administrator will begin when you click Yes in the UAC prompt.
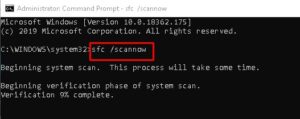
4. After that, at the blinking cursor, type the below command line and press Enter to execute the same.
sfc /scannow
5. Wait a couple of minutes until it finishes searching & correcting corrupt files.
Lastly, Close the command Prompt and Update your Windows Copy again.
3. Perform DISM Command
Bad Memory sector may even cause the issue of 0x80004005 on your Windows 10 device. It is why to try checking the health of your RAM using the DISM command. Here are the simple steps to follow-
1. Type Command Prompt in the Search box, then right-click on the well-matching result from the list.
2. Select the Run as Administrator option from the context menu.
3. If the UAC prompts, click Yes to permit the access.
4. On elevated prompt, now type the following code and press the Enter key at the end.
DISM.exe /Online /Cleanup-image /Restorehealth
5. Since this is a time-consuming process, it probably takes approx 10-15 min to finish the whole process.
When the scanning process is over, Reboot your PC to save the changes.
4. Replace Dpcdll.dll File
Another prime and the actual reason behind this error code 0x80004005 is a missing or faulty Dpcdll.dll file in your system. To fix this issue, you required to copy the Dpcdll.dll file on the problematic computer & install the same under the following path-
%SystemRoot%\System32\Dpcdll.dll directory
1. Go to the official website & download Dpcdll.dll as per your system model, either 32 or 64.
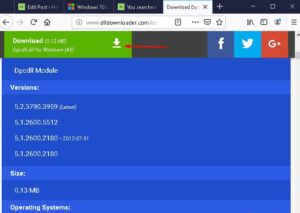
2. The file is available in Zip mode, thus extracting it after downloading and saving it at a particular location.
3. Now double-click on its icon to install the setup file.
4. Furthermore, copy the Dpcdll.dll library and paste it into the C:\Windows\System32 path.
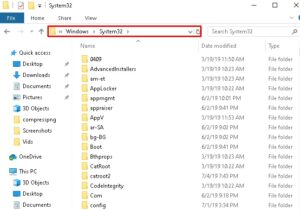
Note: If you’re using a 64-bit computer, copy the Dpcdll.dll file, navigate to the C:\Windows\sysWOW64 directory, and paste the file here.
The bug may disappear after performing the above steps. If not, try the next workaround-
5. Update your PC with the latest patches & SSU
The error code 0x80004005 is an update error and probably auto-fix after installing recent patches or servicing stacks. Here are the easy steps-
1. Firstly, visit the official website Microsoft Update Catalog.
2. Identify & download the latest patches or SSU depending upon your system architect, i.e., 32 or 64 bit.
3. If a new window prompts, click the Save button to download the setup file.
4. Once the download finishes, double click on the setup file to start updating your PC.
5. Afterward, your System updates, Reboot your PC, and check if the issue gets fixed or not.
6. Use System Restore point
System Restore point is the mirror image of your Windows 10 at an earlier point in time. It’s better to create such several restore points when your PC is well functioning & performing effectively.
If you’ve created one such, it’s high time to use that to resolve this 0x80004005 error. Although, if not, move to the next workaround. Here’s the complete procedure to use the previously created system restore point-
1. At first, go to Start and type. Create a System Restore Point in the text box.
2. Now under the System Protection tab, press the System Restore button.
3. Afterward, tap the Next option.
4. Now, select the recently created restore point and press the Scan for affected programs button.
5. If everything is alright, press the Close button then Next to proceed further.
6. Lastly, click the Finish button to start this process.
When the above task is over, your system will return to your previous working state.
7. Perform a Clean Install
If none of the above methods or workarounds fix the Error code 0x80004005, it is better to clean Windows 10. Follow these simple and easy steps for fresh installation-
1. Visit Microsoft’s official website.
2. Here, tap the Download tool now button to download the Media Creation Tool.
3. Once the setup file is downloaded, make a right-click on this and choose the Run as Administrator option.
4. The Windows installation will automatically start. You’ll see two options here. Select the one which best suits you.
5. Here, we’ve selected Upgrade this PC now an option; press the Accept option afterward.
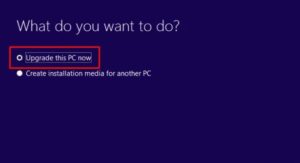
6. Ensure to select the option “keep your files & apps” on the next screen.
7. Finally, press the Install button and follow the on-screen instructions until the entire process is over.
So, the Windows 10 19H1 installation will take several minutes; wait patiently.
Note: Clean installation of Windows 10 will remove all the data from the HDD. Thus, you must create a full backup of your system to protect and save your important data.


