
Whenever you need to include the mouse cursor in the screenshot, most third-party screenshot apps (including the Windows native options) hide the screenshot’s cursor. So, I tried out various screenshots apps and found some highly-rated apps that can certainly help you take screenshots, including the mouse pointer. So, without further ado, let’s check them out.
Apps to take Screenshot with Mouse Pointer
1. Greenshot
As the name suggests, Greenshot is the best screenshot tool that takes screenshots with a mouse pointer by default. Among the remaining apps in the list, taking screenshots with Greenshot is much straightforward and faster.
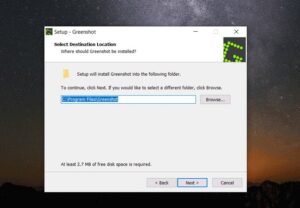
To get started, download the Greenshot app & install it on your system. And the hotkey for taking a screenshot for this app is ctrl + PrtSc. If you’re having any existing shortcut with that hotkey, this app will override it automatically.
Once downloaded, place the cursor where you wish to take a screenshot and press ctrl + PrtSc. The app will take screenshots and show you a pop-up menu. You can move your cursor and tap the “Save as” option to directly save the image.
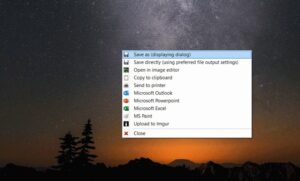
Or you can tap on “Open in image editor” to take a preview, also make some changes such as cropping before saving the screenshot.
Pros
Easy & fast process
In-build image editor
Cons
Can’t change the screenshot hotkey
Share X is one of the most leading and famous screenshot apps for Windows. It not only allows you to take screenshots with the mouse pointer but even partial screenshots or screenshots for particular windows, menus, tabs, etc. If you’re already a ShareX user, here’s how you can take screenshots with a mouse by using Share X.
Download the Share X app, then open it.
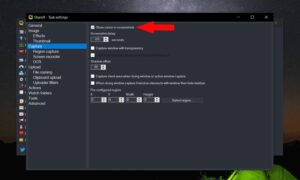
Now tap on the Task settings option.
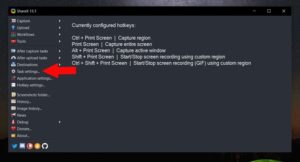
You can see a Task Settings window, choose the option “Capture.” Here ensure that “Show cursor in the Screenshots” is checked.
Afterward, place the cursor when you wish to take the screenshot and press ctrl + PrtSc; you can now move the mouse and choose the portion you want to take a screenshot. That’s all! The screenshot will be taken once you leave your mouse cursor.

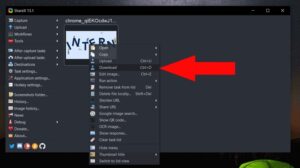
After that, you can open the Share X app, preview the screenshot you wish and then right-click on it and tap on the “Download” option.
Pros
Feature-rich options & customization for your needs
Capability to take partial screenshots easily.
Even take a preview before downloading the image.
Cons
Nothing much.
3. Steps Recorder
Steps Recorder is the best built-in assistance tool used to record a user’s actions on a PC. When recorded, the info can be sent to other users to help with troubleshooting. We can take the benefit of this app to take screenshots with the mouse pointer.
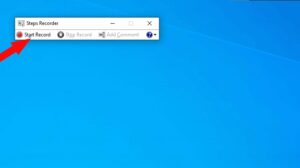
Firstly, open the Start menu and search for “Steps recorder,” then open the app. After that, you can see a small window with an option to “Start Record.” Tap on it.
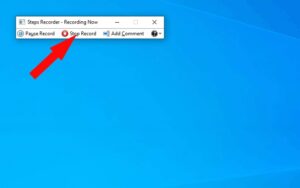
Now minimize the Step recorder window, then place the cursor where you wish to take a screenshot. Step Recorder app merely records your actions, making a left-click with your mouse the same as opening a link. Such action will be recorded as a screenshot.
After that, go back to the Step recorder app and tap on the “Stop recording” option.
You can see the recorded steps & screenshots of it. Just tap on the save button to save these steps as a zip file.
Open that zip file, then open the MHTML file in it. You can find the screenshots, right-tap on the image, and tap on the “save picture as” option, then save it.
That’s all; the image, along with the mouse cursor, will get saved.
Pros
No required to download any third-party app
Best for taking a series of screenshots
Cons
It would help if you tapped with the mouse to take a screenshot, which can be tricky when you wish to take a screenshot showing the link or button.
The UI is not intuitive.
It does not support custom cursors if you’re using any.
4. Irfan View
Irfan View is one of the most famous image viewer or converter app on windows. It is a feature-packed app and even supports screenshot functionality. Here’s how you can easily do that with Irfan View.
Firstly, download the Irfan View app, then install it on your Windows. Afterward, please search for the app in the start menu & open it. The app will now open with a black blank screen. Tap on Options and choose Capture/Screenshot.
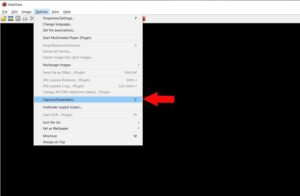
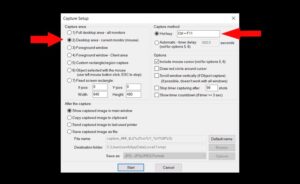
Now in the pop-up windows that appeared, choose the option desktop area and ensure the Hotkey is set to ctrl+F11. Tap on the start option at the bottom of the pop-up window.
After that, place your cursor where you wish to take the screenshot and hit the hotkey ctrl+ F11. Irfan View app will pop-up with the image of your screenshot. You can tap S and save the image to your system.

Pros
You can also use it as a default Image Viewer, & it is faster than the default viewer we get with Windows.
Cons
UI is not entirely intuitive.
Wrapping up
Dear Readers, if you wish to take screenshots for a single time, the Steps recorder is the best option as it is in-built into the system already. If now, you can select Irfan View, Greenshot, or ShareX as per your needs. I like and prefer ShareX for the number of options you get. So what’s your most-liked? Let me know in the below comments.


