
Even if you’re a pro user, we are sure you will not do these print screen tricks on Mac. We have listed all methods and techniques to use the screenshot feature on Mac quickly & effectively.
On a typical Windows machine, you’ll find that there is a keyboard key. That is made for capturing the screen. But that is not a thing that you’ve on a Mac. Although, on Mac, you get way more options to take screenshots than a Windows machine.
It is because, on a Mac, you use a set of keys to capturing the screen in different ways. While having single key sounds just great, the print screen method on Mac is much smarter. There are five methods you can take screenshots on a Mac, and we have detailed all of them below.
Important Keys you need to know
Screenshots are saved in.PNG format from Mac OS X 10.6 & above. They are saved to Desktop by default with date & time. Specific apps like DVD players may not allow taking screenshots. You can even open saved screenshots with Preview, Safari, & other apps.
How to Print Screen on Mac
Capturing Print Screen the Full Screen
For most purposes, you probably need to capture the entire screen. Doing that is pretty straightforward; you need to press three combinations of keys on your Mac as described below:
Press the Command + Shift + 3 key together
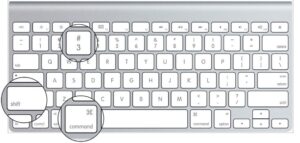
Your screen capture will save on the desktop as “Screen Shot” along with by date & time.
Capturing Print Screen of a particular Portion on Mac
Suppose you want to screenshot a specific part of the screen. Then the process of three key combination remains the same. It is just that the combination of keys is slightly changed.
Press the Command + Shift + 4 key altogether.
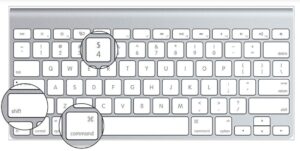
The cursor changes to a Print Screen icon, and you can then click and drag to select that particular section of the screen. When you do that, the portion is automatically captured, and you’re all done.
Capturing Print Screen of a Window on Mac
In most cases, we need to capture just one particular window. Just ensure that the window you want to capture is active & also open. Then do these following steps:
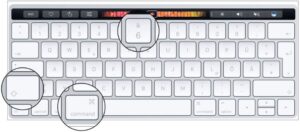
- Press the Command + Shift + 4 key together.
- When the cursor changes to a cross-hair, then press the spacebar.
- The cursor now changes to a camera icon. Point and then tap the camera icon on the window. That needs to be captured. The picture, as always, will be saved on the desktop.
Print Screen of a Menu on Mac
- Open the menu that you need to capture.
- Now press Command + Shift + 4 key, and then the mouse cursor will turn to cross-hair icon.
- Now press the spacebar key after the cursor has turned to the cross-hair icon. The icon will now change to the camera icon.
- Navigate the Camera icon to the menu you want to capture.
- You will notice that it highlights the menu; it is now time to capture it. Just tap the mouse button to capture the menu.
Capturing Print Screen of the Touch Bar on Mac Pro
Before you go to the tutorial, ensure that your MacBook Pro runs macOS Sierra 10.12.2 or later.
You have to press shift + command + 6 key to capture the screen.
You’re at liberty to customize the Control Strip region of your Touch Bar and include a Screenshot option. It will make it easier. It provides you an easy way to take the screenshot, change screenshot type, and also change the location to save it.
Conclusion
I sincerely hope you like this post and find it helpful to you. If you have further issues related to this article, let us know in the comments below section. We’ll get back to you shortly.


